In this article, we will show you how to fix the internal server errors in WordPress.
The internal server errors are status codes returned by the web server whenever it encounters a condition that prevents it from completing the request initiated by the client. This error message does not necessarily mean that the web server is responsible. The causes of such errors are multiple. We’ll be discussing several solutions to this problem and walking you through each.
Quick Steps:
- Check for corrupt .htaccess rules.
- Increase the PHP Memory limit in WordPress.
- Deactivate faulty plugins.
- Check file permissions.
- Upload the core WordPress files to your site.
Create a New .htaccess File
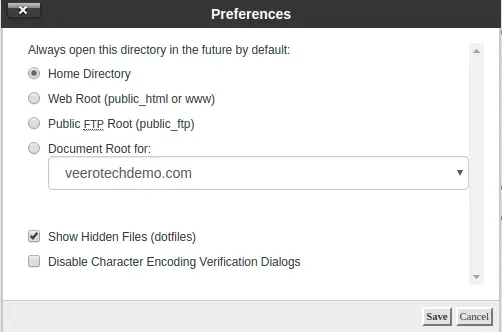
Create a new .htaccess file on your WordPress root directory – public_html. If you cant find the .htaccess file or any dotfiles, enable Show Hidden Files (dotfiles) from the Settings icon on the top right corner of your window.
Settings in File Manager.
Once you found the .htaccess file, right-click the file and rename it to .htaccess.bk to disable it. To create a new .htaccess file, go to your WordPress Admin >> Settings and select Permalinks. Scroll down to the bottom of the page and click the save button. This will create a new .htaccess file with the proper redirection rules for your site.
Open your browser and call your website. If your site loads then the 500 internal server error was caused by the corrupted .htaccess file. If you’re still seeing the error, move on to the next section.
Increasing the PHP Memory Limit
Another way of fixing the 500 internal server error is by increasing the PHP memory limit in WordPress and refreshing your site to test whether or not this is causing your 500 internal server error.
Open File Manager and locate the wp-config.php file from your root directory. Right-click on the file, and select Edit to add the following code below inside the opening PHP tag,
define(‘WP_MEMORY_LIMIT’, ’64M’);
ini_set(‘post_max_size’, ’64M’);
ini_set(‘upload_max_filesize’, ’64M’);
Refresh your site and if you are still seeing the error then the issue is not because of the PHP memory limits. Remove the above code from the file wp-config.php and save it.
Deactivating Plugins
Connect to your website using a FTP client, or the File Manager tool in cPanel. Once connected navigate to the wp-content folder. Right click on the plugins folder and select Rename. Change the name of the plugins folder to plugins.bk. This essentially deactivates all the plugins on your site.
Refresh your website. If the site loads, then the error was due to a faulty plugin. Activate each plugin one by one and refresh your website after each plugin activation to find out the problematic plugin.
Check the File Permissions
Permissions for the folders and files in your WordPress directory should be 755 or 644, respectively .Check if they have the correct permissions. If they are anything else but 755 or 644, it can cause these 500 errors. To solve this, open up File Manager, go to the root directory and right-click on the files/directories that have the incorrect permissions and click Change Permissions. A popup window will appear on which you can set the permissions to 755 or 644.

Changing Permissions via File Manager.
Re-building the Core WP Files
This step is considered as a last resort. Download a fresh installation of WordPress from their downloads page. Extract the zip file and open the extracted folder. Connect to your WordPress website using an FTP client and upload the wp-admin and wp-includes from your fresh version of WordPress to the root folder of your website – /public_html. The FTP client will now transfer those folders to the site’s directory, overwriting the older files.
Conclusion
The 500 internal server errors can be really frustrating, we know, as it is difficult to pin point the exact cause of the error. If all methods fail, then contact us. We’ll be happy to take a look.