There are a number of plugins that permit configuring Redis as Object Cache for your WordPress website, thereby enhancing its performance. In this article, we discuss LiteSpeed Cache for WordPress, also known as LSCWP, and Redis Object Cache plugins.
Before beginning this tutorial, it is assumed that Redis has been enabled in cPanel. If not, please read this article to get started.
Also, make a note of the Redis socket path and port displayed in the cPanel >> Redis Manager Plugin.
Configuring Redis in LiteSpeed Cache for WordPress (LSCWP) plugin
If you are using Lite Speed Cache for WordPress (LSCWP) plugin, navigate to Cache settings on the left menu and select [6] Object tab.
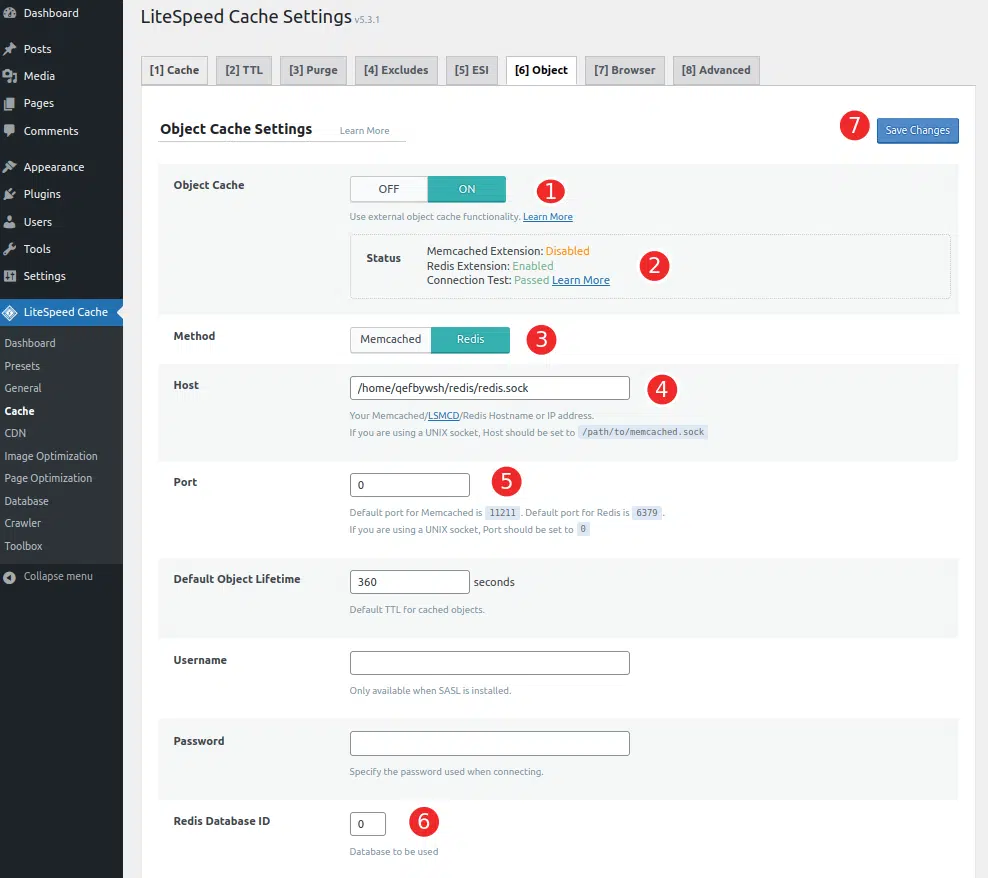
LSCWP Object cache configuration with Redis
Ensure settings are made as above in your setting page, i.e.
- Turn ON Object Cache.
- In the Status box below, if you have already enabled the PHP Redis module, it will show Redis Extension as Enabled. If it shows Disabled, ensure it’s enabled in cPanel >> Select PHP version for the selected PHP version.
- Choose Method as Redis next.
- The Host is the socket path you have copied from the cPanel Redis Manager plugin.
- Port is always 0 as you are using a Unix Socket connection, not HTTP.
- Redis Database ID should be unique if you have multiple WordPress or other CMS configured with the Redis instance you have for your cPanel account. i.e., for the first website, default 0 is used. On the next website, you should use it as 1 or any value up to 7 but not 0. This is to avoid potential cache conflicts. You can use up to 8 databases in total for a cPanel account.
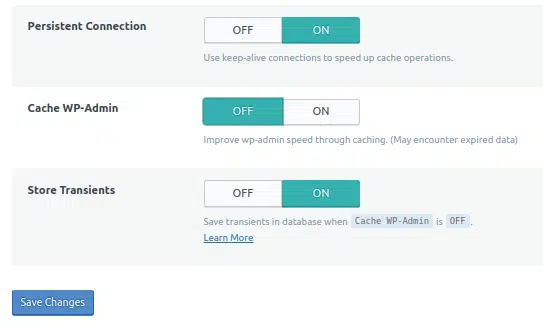
- Scroll down a bit and ensure “Persistent Connection” and “Store Transients” are set to ON
- Click “Save Changes”
LSCWP Object cache configuration with Redis
Once saved, you should see “Connection Test” as passed in the Status box. If it shows failed, ensure Host is correct and is added without any spaces. If the issue persists, let us know.
For more details on LSCWP configuration, you can also check out the official page here.
Configuring Redis using the “Redis Object Cache” plugin
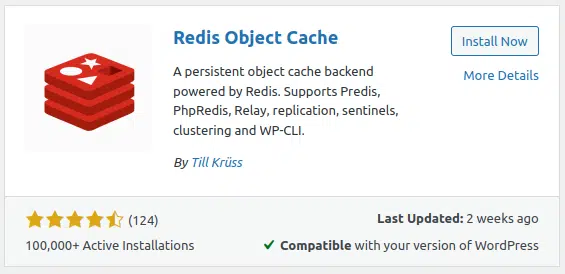
Once logged in as administrator to your WordPress installation, go to plugins >> Add New and search for the “Redis Object Cache” plugin. Locate the Redis Object Cache as in the screenshot below, and then click Install Now.
Redis Object Cache plugin for WordPress
Once installed, click Activate and you will be presented with a screen as below.
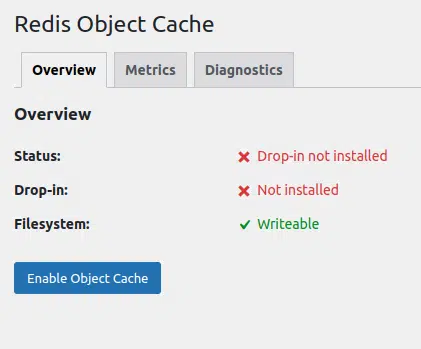
Redis Object Cache plugin activation page
Before clicking “Enable Object Cache”, open wp-config.php in your favorite text editor or editor in the cPanel file manager and add these two lines just above the /* “That’s all, stop editing! Happy publishing. */ line near the end of the file.
define( 'WP_REDIS_SCHEME', 'unix');
define( 'WP_REDIS_PATH', '/home/username/redis/redis.sock');
Replace the username with the cPanel username and save the changes.
On WordPress, on the Redis Object Cache page, click Enable Object Cache. When you see green checkmarks for Status, Drop-in, and File system, Redis is activated and running for WordPress.
There are no other configurations required to take advantage of performance improvements from Redis caching, and it works flawlessly with other caching plugins. The following options are available in the plugin interface:
- To view Redis caching statistics for your website, click the Metrics tab.
- To view configuration and debugging information in greater detail, select the Diagnostics tab.
- To clear the Redis cache, click the Flush Cache button.
- Click Disable Object Cache to disable Redis caching.
More options to add Redis to your WordPress
While the above are commonly used plugins, there are several other plugins like W3TC, WP-Redis which also do the Redis integration. If you are using a different one and need assistance or an article regarding it, mention it in the comment section below.
Conclusion
Adding Redis Object Caching to WordPress sites is beneficial in terms of performance on the website. This article sheds light on configuring Redis object cache on your WordPress website using the two most widely used plugins – LSCWP and Redis Object Cache, which undoubtedly enhances caching and performance.
If you have any web hosting questions please feel free to reach out to us. We're happy to help.
Our Guiding Principles
Awesome tutorial. Well written, clearly illustrated, easy to follow. Solved the problem I was having and prevented a support ticket 🙂
Thank you