WP-CLI has been around for quite some time (in fact, ever since 2011) and is steadily gaining popularity in the WordPress developer community. But what is it, and how can you use it in your WordPress workflow? In this article, we will be taking a closer look at WP-CLI and the various advantages that it has to offer.
Getting Started with WP-CLI
The idea behind WP-CLI is that it allows you to interact with and manage WordPress sites through a command-line interface. In other words, it can be said that WP-CLI is a command-line alternative as opposed to the traditional WordPress admin user interface.
The command-line approach makes sense, because you can usually do things on your computer much faster using the command line, and the WP-CLI is no different. If you’ve ever used the command line on Windows or the Terminal on macOS, you’ll feel very comfortable using the WP-CLI.
The main advantage of using WP-CLI is the time saved when installing, configuring, and managing your WordPress site. For example, if you have several sites, you will no longer need to go to each of them to perform routine tasks, you can simply configure the WP-CLI to perform them automatically, or fire one command to update plugins and themes across multiple sites, and so on.
First Things First
Before going any further, we first need to install WP-CLI.
Installing the WP-CLI for the first time may seem a bit complicated, but it is not that hard if you understand exactly what is required.
Installing on Linux (Shared Hosting or VPS)
First, we need to get the latest version of the WP-CLI. The recommended way to do this is to download the WP-CLI as a Phar file via the command line. This is just a PHP archive file containing all the PHP files needed to run the WP-CLI, all wrapped in one handy file ready for download.
Next, if you are on a shared hosting plan, make sure SSH is active. If you do not have SSH access, or are unsure, simply fire a ticket to our Support team and we’d sort it for you!
If you want to install the WP-CLI on a VPS or local Linux system, follow the steps below:
To get started, make sure that WP-CLI is not already installed using the command:
wp --version
If you see in the WP response: command not found, then it’s time to start installing stuff.
Download the WP-CLI files with the following command:
curl-O https://raw.githubusercontent.com/wp-cli/builds/gh-pages/phar/wp-cli.phar
Confirm the download authenticity with the command:
php wp-cli
phar --info
Now you need to install the downloaded Phar file as an executable file. Type:
chmod +x wp-cli.phar
To complete the installation, move the WP-CLI files to their final location:
sudo mv wp-cli.phar /usr/local/bin/wp
Now, since we have WP-CLI installed, you can start working with your WordPress content through the CLI.
Installing on Windows
Installing on Windows is a bit more complicated, as PHP is not available from the command line by default. You can install PHP manually, but the easiest way is to use a local development server like MAMP, because PHP is automatically installed as part of a shared package.
Make sure that PHP is installed on your Windows system, and it is available globally — that is, it is triggered by the php command in the command line.
Download wp-cli.phar and put it in the C:\wp-cli directory.
Create a wp.bat file in the same directory C:\wp-cli. Inside the file should be the code:
@ECHO OFF \
php "c:/wp-cli/wp-cli.phar" %*
Next, add a path to the PATH variable using the command line:
setx path "%path%;C:\wp-cli"
Installation is complete. You can check it with the command:
wp –info
Installing on macOS
Open a Terminal window and type the following text to download the WP-CLI Phar file:
$ curl -O https://raw.githubusercontent.com/wp-cli/builds/gh-pages/phar/wp-cli.phar
This will download the Phar WP-CLI file to your computer. Let us check that everything is in order by testing the WP-CLI archive.
php wp-cli.phar --info
You should see a result similar to the following:
To make using the WP-CLI more convenient to use, we want to be able to run it from anywhere and with a shorter command like wp, instead of having to type wp-cli.phar every time.
We can do this with the following two commands:
chmod +x wp-cli.phar
sudo mv wp-cli.phar /usr/local/bin/wp
Now try running wp-info in a terminal window (pointing to any directory). If you see the same result as before when you ran php wp-cli.phar-info, then you did everything correctly. WP-CLI is set up and ready to use!
How to Use WP-CLI?
To begin with, it is advisable to log in via SSH under the desired user; and you do not always need to login as root user.
Then, just go to any directory (folder) of the site and run the command in the SSH console:
wp --info
This command will display information about the installed version of PHP and other service information.
Or, if you so desire, you can run from root:
sudo -u USER -i -- wp --info
where USER is the username of the user under which WordPress is installed, the result will be the same.
General information about WP-CLI commands
WP-CLI is a relatively simple tool. If you are already familiar with the command-line environment, it will not be difficult to learn how to work with it. With it, you will be able to manage your blog through the command line interface, which is often much faster than finding the desired function in the WordPress control panel, and the ability to create scripts will help you automate some of the commands.
WP-CLI comes along with several pre-installed commands. Their list can be expanded after installing certain plugins that are supported by the WP-CLI. We will now be going through some of the top WP-CLI commands:
For instance, to install WordPress, you can enter:
wp core download --locale=en_EU
wp config create
wp core install
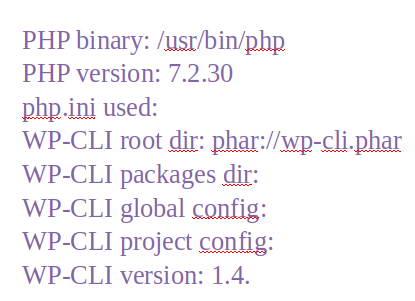
The command below shows information about the WP-CLI version:
wp –info
Approximate result:
PHP binary: /opt/alt/php72/usr/bin/php
PHP version:    7.2.16
php.ini used:   /opt/alt/php72/etc/php.ini
WP-CLI root dir:    phar://wp-cli.phar
WP-CLI packages dir:
WP-CLI global config:
WP-CLI project config:
WP-CLI version:  1.1.0
This command is required to get the list of WP-CLI commands and its documentation:
wp help
Approximate result:
DESCRIPTION
Manage WordPress through the command-line.

SYNOPSIS
wp <command>

SUBCOMMANDS
cache            Manage the object cache.
cap              Manage user capabilities.
cli              Manage WP-CLI itself.
comment          Manage comments.
core             Download, install, update and manage a WordPress install.
cron             Manage WP-Cron events and schedules.
db               Perform basic database operations using credentials stored in wp-config.php
eval             Execute arbitrary PHP code.
eval-file        Load and execute a PHP file.
You can also view the help page for each individual command. For example, if you want to learn more about the comment command, enter:
wp help comment
Approximate output:
NAME
wp comment

DESCRIPTION
Manage comments.

SYNOPSIS
wp comment <command>

SUBCOMMANDS
approve       Approve a comment.
count         Count comments, on whole blog or on a given post.
create        Create a new comment.
delete        Delete a comment.
exists        Verify whether a comment exists.
generate      Generate some number of new dummy comments
Database Commands
Creating a backup of the WordPress database by adding the Drop Table option to the tables (that is, even if the tables exist in the database at the time of import from the dump, they will be reset and forcibly overwritten) can be accomplished using:
wp db export --add-drop-table
Import a database from the WP database named db124 can be done as follows:
sql filewp db import db124.sql
Delete all tables from the database (be careful, make a pre-backup of the database):
wp db reset --yes
Delete the entire database (be careful, make sure you have a backup of the database):
wp db drop
Create a database (for example, after deletion) with the privileges specified in wp-config.php file:
wp db create
When moving to a new domain (for example, a site from a local server moves to a live hosting server or simply changes the domain name), WP-CLI can be used as well:
wp search-replace 'http://olddomain' 'http://newdomain'
Using the WP-CLI to Install WordPress
You can perform the WordPress installation process via the command line, as shown above. However, you need to create a MySQL database before starting the installation. Let us take a moment to look at the process again, albeit this time in greater detail.
If you are using the WP-CLI on a VPS or Linux system, follow these steps to create a new MySQL database:
Log in to MySQL:
mysql -yourusername -p
Create a database for the WordPress installer:
create database wordpress
Grant permissions:
grant all on wordpress.* to 'username' identified by 'password'
Now that your database is ready, you can download the WordPress installer files, as before:
wp core download --locale=en_EU
wp config create
wp core install
Approximate output:
Downloading WordPress 5.4.2 (en_US)...
md5 hash verified: 00000000000000000000000000
Success: WordPress downloaded.
Update Core
If the WordPress installation needs updating, use the wp core update and wp core update-db subcommands to update the main files and database (if the database needs updating as well).
WordPress updates, especially security fixes, are essential. To make them faster, WP-CLI can be used.
wp core update
wp core update-db
You can always check the current installation version with core version using:
wp core version
Initially, updating from the command line may not seem any more efficient than doing it from the dashboard, but if you support multiple WordPress installations, it can save a lot of time and clicks. You can create a script and update them all at once:
#!/bin/bash
declare -a sites=('/var/www/wp1' '/var/www/wp2' '/var/www/wp3')
for site in "${sites[@]}";
do wp --path=$site core update
Working with WordPress Multisite
A huge advantage of WP-CLI and the command line in general is the ability to automate repetitive tasks using scripts. This also applies to the WordPress Multisite network. Instead of visiting the Dashboard of each website to complete a task, you can simplify the process by using some lines of code. For example, you can use the following script to install and activate a plugin across a WPMU site:
#!/bin/bash
for site in $(wp site list --field=url)
do
wp plugin install plugin-name-here --url=$site --activate
If you want to avoid the extra steps of creating and running a script file, you can run the previous example with a single command:
for sitein $(wp site list--field=url);do wp plugin install plugin-name-here--url=$site--activate;done
Using WP-CLI remotely with SSH
If you have already installed the WP-CLI on a remote server, or if your hosting provider (such as VeeroTech) supports it, then you can connect via the SSH terminal and use the WP-CLI commands. The only thing you will need is an SSH client and host credentials to connect to the server.
Linux and Mac OS X users do not need additional software, as this can be done using the Terminal application. For Windows users, there are third-party tools, the most popular of which is Putty.
Using any such SSH client application, you can connect to the server using this command:
ssh username@host
You will be prompted for your password and, if you connect successfully, you will have a command line interface to use the WP-CLI tools for your websites with this host. In case the WP-CLI is not available, you can follow the steps described in this article to install it. At the end of the process, you can verify that it was installed successfully by typing the following command:
wp cli version
If everything went well, you will get the current version.
Conclusion
In addition to these basic commands, the WP-CLI functionality can be extended with third-party plugins. Working with WordPress becomes much easier when you don’t have to go from section to section of the control panel to search for a specific feature. If you have several WordPress sites, you can save a good deal of time on everyday tasks. This guide has given you the foundation that you need to work with the basic tasks and features of the CLI for WordPress.
We’ve only touched on the surface of what you can do with the WP-CLI. But hopefully you’ll now have enough confidence to delve deeper into the WP-CLI and experiment with more advanced commands. Speaking of commands, here are some awesome WP-CLI power commands that you should master. <link here>
In this article, we learned what the WP-CLI is and how useful it is in everyday WordPress development. If you have used the WP-CLI, do share your thoughts in the comments below!
If you have any web hosting questions please feel free to reach out to us. We're happy to help.