
Have you ever tried to update a WordPress plugin, upload a large image, or open your website’s dashboard, only to encounter an error saying that the allowed memory size has been exhausted? This issue can interrupt your work, affect website functionality, and make routine maintenance frustrating.
One possible solution is to increase the WordPress PHP memory limit. PHP memory is the amount of memory PHP scripts can use while processing your website’s requests. WordPress, plugins, themes, and other website functions all rely on available PHP memory.
When the configured limit is too low for your site’s workload, WordPress may display errors or fail to complete certain operations. Increasing the limit can help, provided your hosting plan and server configuration allow it.
In this guide, you’ll learn how the WordPress PHP memory limit works, how to change it safely, which method to choose, and how to troubleshoot common memory-related problems.
What Is the WordPress PHP Memory Limit?
The WordPress PHP memory limit determines how much memory PHP can allocate to a WordPress request. Memory is used when processing database results, running plugins, rendering pages, generating images, and executing other PHP tasks.
A simple blog with a few plugins may require relatively little memory. An online store, membership website, or site with a page builder and several resource-intensive plugins may need more.
Why Does the PHP Memory Limit Matter?
The correct WordPress PHP memory limit can help your website:
- Process demanding WordPress tasks more reliably.
- Run compatible plugins and themes without memory-related interruptions.
- Complete media processing and administrative operations.
- Reduce errors caused by insufficient PHP memory.
- Handle resource-intensive features when sufficient server resources are available.
However, increasing the limit does not automatically make a website faster. If a plugin contains a memory leak or the server is overloaded, you may need to address the underlying problem.
What Is a Typical WordPress PHP Memory Limit?
The appropriate limit depends on your WordPress version, installed software, workload, and hosting environment. A value of 128 MB may be sufficient for some websites, while 256 MB or more may be appropriate for demanding applications if supported by the server.
WordPress also distinguishes between its general memory limit and the limit used for administrative operations.
| Memory limit | Potential use case |
| 64 MB | Very limited or older environments; may be insufficient for modern sites |
| 128 MB | Basic websites with modest plugin requirements |
| 256 MB | Many business websites and moderately complex WordPress installations |
| 512 MB | Some resource-intensive sites, if justified and supported by the host |
These are general reference points, not universal requirements. Always check your hosting provider’s limits and your site’s actual resource usage.
How to Check Your Current WordPress PHP Memory Limit
Before changing any settings, check your current PHP memory configuration. This helps you determine whether your website actually needs a higher limit.
Method 1: Check WordPress Site Health
- Log in to your WordPress dashboard.
- Navigate to Tools → Site Health.
- Open the Info tab.
- Expand the Server section.
- Look for the PHP memory limit and related server information.
The exact information displayed may vary by WordPress version and hosting configuration.
Method 2: Check Your Hosting Control Panel
If your hosting account provides cPanel or another control panel, look for PHP configuration settings. Depending on the environment, you may find a PHP Selector, MultiPHP INI Editor, or a similar option.
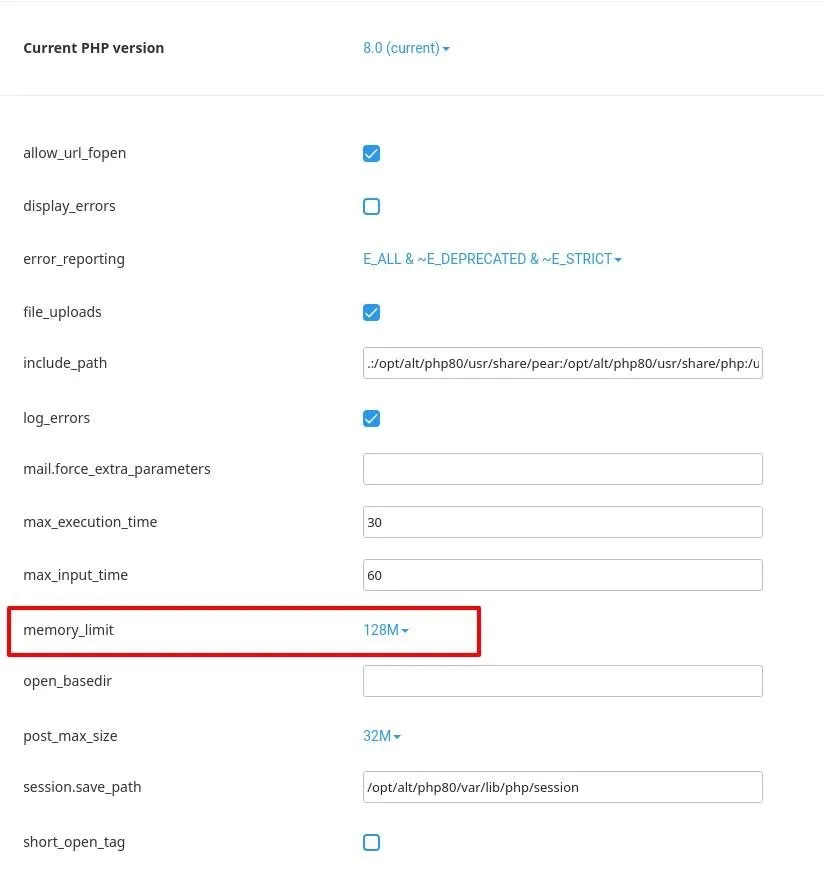
Check the currently configured memory limit before making any changes.
How to Increase WordPress PHP Memory Limit: 4 Methods
There are several ways to change the PHP memory limit in WordPress. The correct method depends on your hosting environment and the permissions available to your account.
Method 1: Increase WordPress Memory Limit Using wp-config.php
Editing wp-config.php is a common approach for setting WordPress’s requested memory limit.
Image placement: Add a screenshot of the WordPress root directory with wp-config.php highlighted.
- Back up your website before editing any files.
- Open your hosting control panel’s File Manager or connect using SFTP.
- Navigate to your WordPress installation’s root directory.
- Locate wp-config.php.
- Open the file in a text editor.
- Add the following lines before the comment that says /* That’s all, stop editing! Happy publishing. */, if that comment exists.
define( ‘WP_MEMORY_LIMIT’, ‘256M’ );
define( ‘WP_MAX_MEMORY_LIMIT’, ‘512M’ );
Important: These are example values, not settings every website needs. WP_MEMORY_LIMIT requests the memory available to ordinary WordPress operations, while WP_MAX_MEMORY_LIMIT requests a higher limit for certain administrative tasks. WordPress may not be able to apply either value if PHP or the hosting provider imposes a lower limit.
If these constants are already defined, edit the existing definitions rather than adding duplicates. Also, some hosts manage these settings automatically.
- Save the file.
- Return to WordPress Site Health and check the reported configuration.
If the displayed limit does not change, your host may control the effective PHP limit. Use the hosting-level method or contact support.
Method 2: Change PHP Memory Limit in WordPress Using cPanel
If your hosting provider offers cPanel with PHP configuration tools, you may be able to change the memory limit without editing WordPress files.
Follow these steps:
- Log in to your hosting control panel.
- Search for MultiPHP INI Editor, Select PHP Version, or PHP Options.
- Select the correct domain or PHP environment, if prompted.
- Locate the memory_limit
- Choose a value such as 256M, if permitted and appropriate.
- Save or apply the changes.
- Recheck your WordPress site’s effective PHP memory limit.
The available controls differ between hosts. If the setting is missing or locked, ask your provider to confirm the supported limit.
Method 3: Update PHP Settings Through php.ini or .user.ini
Some hosting environments allow you to configure PHP through a php.ini or .user.ini file.
For a server that supports local PHP configuration, the relevant directive is:
memory_limit = 256M
To use this method:
- Confirm with your hosting provider which configuration file your PHP environment reads.
- Back up the existing configuration file, if applicable.
- Add or update the memory_limit
- Save the file in the location supported by your hosting environment.
- Allow any required configuration refresh or caching interval.
- Check the effective memory limit again.
Do not assume that every server supports .user.ini or permits customers to override memory_limit. On managed or shared hosting, these settings may be controlled centrally.
Method 4: Ask Your Hosting Provider to Increase the Limit
If the previous methods do not work, contact your hosting provider. This is often the safest option when you are unsure which PHP configuration controls your website.
Ask the support team to:
- Confirm your current effective PHP memory limit.
- Check whether the limit can be increased for your hosting plan.
- Review PHP error logs for memory exhaustion.
- Verify whether a plugin or theme is consuming excessive memory.
- Recommend an appropriate limit based on your site’s workload.
A hosting provider can help distinguish between a configuration issue and a server resource limitation.
Comparison of WordPress PHP Memory Limit Methods
| Method | Best for | Main consideration |
| wp-config.php | WordPress-level memory requests | Cannot override every server-level restriction |
| cPanel PHP settings | Hosting accounts with PHP configuration tools | Options vary by provider |
| php.ini / .user.ini | Environments that support local PHP configuration | File location and permissions matter |
| Hosting support | Managed or restricted environments | Provider assistance may be required |
For beginners, start by checking Site Health and your hosting control panel. If the effective limit is controlled by your provider, contact support rather than repeatedly changing WordPress files.
How to Fix the WordPress Memory Exhausted Error
Increasing the memory limit may resolve the problem, but it is important to investigate the error itself.
1. Identify the Error Message
A WordPress memory exhausted error may include wording such as:
Allowed memory size of … bytes exhausted
This indicates that a PHP process attempted to use more memory than its allowed limit.
Check the PHP error logs for the file path and operation mentioned in the message. These details may help identify whether the issue involves a plugin, theme, or WordPress core process.
2. Disable Recently Added Plugins
If the error started after installing or updating a plugin, test whether that plugin is responsible.
- Back up your website.
- Disable the suspected plugin if you can safely access the dashboard.
- If the dashboard is unavailable, use your hosting file manager or SFTP carefully.
- Test the affected operation again.
- Contact the plugin developer if the issue persists.
Avoid disabling essential plugins on a live business website without understanding the impact.
3. Switch to a Default Theme for Testing
A poorly optimized or incompatible theme can contribute to excessive memory usage. Temporarily test with a default WordPress theme in a staging environment, if available. If the error disappears, investigate the original theme and its custom code.
4. Update WordPress, Themes, and Plugins
Outdated software can contain compatibility problems or inefficient code. Back up the site and test updates before applying them to a production website.
5. Review Server Resources
If the error continues even after a reasonable memory increase, check your hosting account’s resource usage. CPU limits, physical memory availability, concurrent processes, and other account restrictions can affect performance.
For additional help with related website errors, consider VeeroTech’s resources and services for shared hosting, managed VPS hosting, and managed WordPress hosting.
Best Practices for WordPress PHP Memory Limit Configuration
Changing the WordPress PHP memory limit should be part of a broader website maintenance strategy.
Set a Reasonable Limit
Do not automatically assign the highest possible memory value. Choose a limit based on the site’s needs and the resources permitted by your hosting plan.
Keep Regular Backups
Before editing wp-config.php or PHP configuration files, create a backup. A syntax error in a configuration file can prevent WordPress from loading correctly.
Test Changes in a Staging Environment
For business websites and online stores, test configuration changes in staging before applying them to the live website. Verify the dashboard, forms, checkout process, and other essential functions.
Monitor Performance After Increasing Memory
A higher memory limit can allow a PHP process to consume more memory, but it does not fix inefficient code. If usage continues to increase, investigate plugins, themes, scheduled tasks, and custom scripts.
Choose Hosting That Matches Your Website
Websites with heavy page builders, complex plugins, or growing traffic may need more flexible server resources. Depending on your needs, explore these VeeroTech hosting options:
- Shared Hosting — for websites that fit a shared hosting environment.
- Managed VPS Hosting — for workloads that need more configurable server resources.
- Semi-Dedicated Hosting — an option to evaluate for websites that need a different resource allocation.
- Reseller Hosting — for users managing hosting accounts for multiple clients.
- Managed WordPress Hosting — for WordPress-focused hosting needs.
Compare each plan’s actual resource limits and support features before deciding which is right for your website.
Conclusion:
Learning how to increase the WordPress PHP memory limit can help you resolve memory-related errors and keep important website operations running reliably. Start by checking your current PHP settings, choose an appropriate method, and verify that the effective limit has changed.
If the WordPress memory exhausted error continues, investigate your plugins, themes, and server resource usage instead of continually increasing the limit. A properly configured WordPress installation and suitable hosting environment can make maintenance more predictable as your website grows.
Need reliable hosting for your WordPress website? Explore VeeroTech’s managed WordPress hosting or managed VPS hosting to find an environment that fits your performance, resource, and support requirements.
Frequently Asked Questions
1. How do I increase the WordPress PHP memory limit?
You can request a higher WordPress memory limit using wp-config.php, change the PHP memory_limit through your hosting control panel, or edit a supported PHP configuration file. If the host controls the setting, contact support.
2. What is the recommended WordPress PHP memory limit?
There is no single value for every website. A limit of 128 MB may work for a basic site, while 256 MB or more may be appropriate for more demanding installations. Your actual needs depend on the software, workload, and hosting restrictions.
3. Why does the WordPress memory exhausted error appear?
It appears when a PHP process attempts to allocate more memory than its configured limit. Common causes include resource-intensive plugins, theme code, large operations, or a memory limit that is too low for the task.
4. Can I increase the PHP memory limit without cPanel?
Yes. If your hosting environment permits it, you can use wp-config.php, php.ini, or .user.ini. Otherwise, your hosting provider may need to change the server-side configuration.
5. Will increasing the PHP memory limit make WordPress faster?
Not necessarily. It can help operations that fail because of insufficient memory, but it does not automatically improve page speed. Slow queries, excessive plugins, inefficient code, and server resource constraints may require separate fixes.
If you have any web hosting questions please feel free to reach out to us. We're happy to help.