Django is a high-level Python web framework designed for rapid development and clean, pragmatic design. While shared hosting environments are often more restrictive than VPS or dedicated servers, you can successfully host Django applications using cPanel’s Python Selector and the Passenger (mod_passenger) engine. This guide provides a comprehensive walkthrough for setting up your environment, installing the framework via SSH, and configuring the necessary entry points to get your application live on a Linux-based shared hosting account.
Quick Steps
-
Create a Python Application within the cPanel interface.
-
Connect via SSH to activate your virtual environment and install Django.
-
Configure your Settings.py for allowed hosts and static paths.
-
Set up URLs and the passenger_wsgi.py entry file.
-
Run Migrations and create a Superuser account.
-
Restart the application in cPanel and test your domain.
Follow the step-by-step instructions below to install and configure Django on your hosting plan.
Create a Python App in cPanel
Your first step is to establish the environment within cPanel. Navigate to the Software section and click on Setup Python App.
Setup Python App
Then select Create Application.

Setup Python App
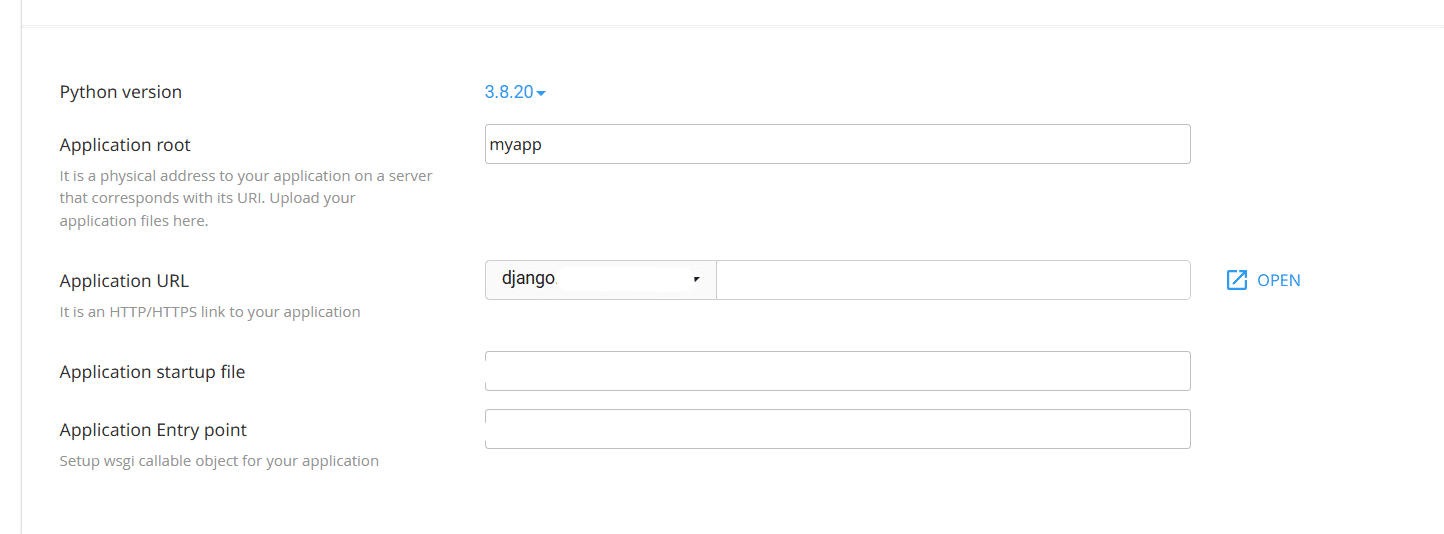
You will need to choose your desired Python version (such as 3.8.2) and set an Application root (e.g., myapp). Select your domain from the dropdown menu and leave the startup file fields blank, as cPanel will generate these automatically.
Setup Python App
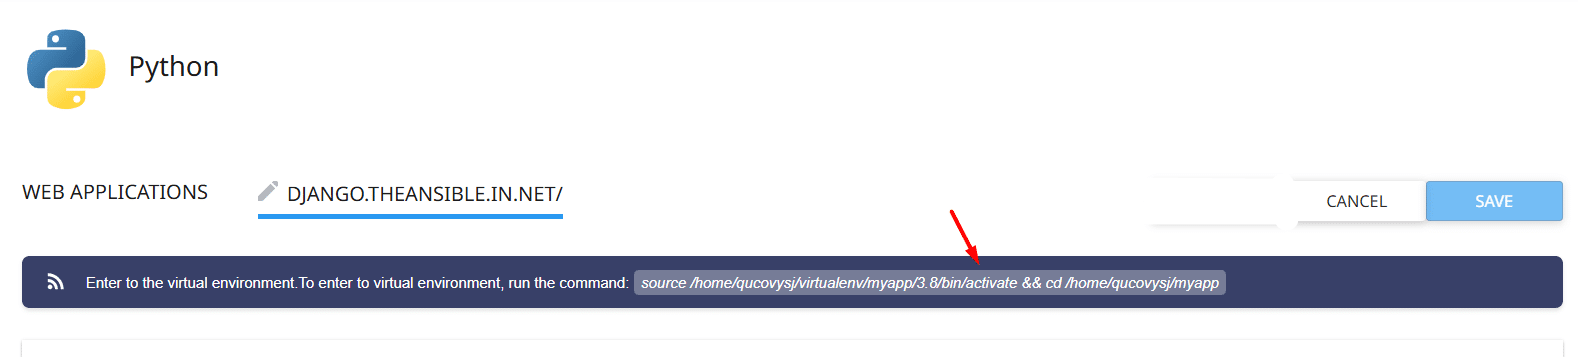
Once you click Create, look for the command to enter the virtual environment at the top of the page and copy it for the next step.
Setup Python App
Set Up Django in SSH
To perform the actual installation, you must log in to your account via SSH. Paste the command you copied from cPanel to activate your virtual environment, ensuring you are working within the correct isolated path.
source /home/username/virtualenv/myapp/3.8/bin/activate && cd /home/username/myapp
Once active, you should move to your home directory and run pip install django==2.1.8 (or your preferred version). You can verify the installation by typing django-admin --version. Finally, initialize your project by running django-admin startproject myapp ~/myapp to generate the necessary file structure.
Configure Django Settings
Before the application can serve pages, you must define where your files are located and which domains are allowed to access the app. Start by creating directories for your templates and static media using the following commands.
mkdir -p ~/myapp/templates/static_pages
mkdir ~/myapp/static_files
mkdir ~/myapp/static_media
Next, open ~/myapp/myapp/settings.py in a text editorand then make the following changes,
To locate and modify the ALLOWED_HOSTS line in your Django project settings, follow these steps. Replace example.com with your own domain name.
ALLOWED_HOSTS = ['example.com']
Locate the TEMPLATES block, and then modify it as follows:
TEMPLATES = [
   {
        'BACKEND': 'django.template.backends.django.DjangoTemplates',
        'DIRS': [os.path.join(BASE_DIR,'templates')],
        'APP_DIRS': True,
        'OPTIONS': {
            'context_processors': [
                'django.template.context_processors.debug',
                'django.template.context_processors.request',
                'django.contrib.auth.context_processors.auth',
                'django.contrib.messages.context_processors.messages',
            ],
         },
     },
]
Locate the STATIC_URL line, and then add the following lines beneath it:
STATIC_URL = '/static/'
STATIC_ROOT = os.path.join(BASE_DIR, 'static_files')

MEDIA_URL = '/media/'
MEDIA_ROOT = os.path.join(BASE_DIR, "static_media")
Configure URLs and Passenger
Use a text editor to open the ~/myapp/myapp/urls.py file. Delete all of the existing text, and then copy the following text into the file:
from django.contrib import admin
from django.urls import path, include
from django.conf import settings
from django.conf.urls.static import static
from django.conf.urls import url
from django.views.generic.base import TemplateView

urlpatterns = [
    path('admin/', admin.site.urls),
    url(r'^
Use a text editor to open the ~/myapp/passenger_wsgi.py file. Delete all of the existing text, and then copy the following text into the file:
import os
import sys

import django.core.handlers.wsgi
from django.core.wsgi import get_wsgi_application

# Set up paths and environment variables
sys.path.append(os.getcwd())
os.environ['DJANGO_SETTINGS_MODULE'] = 'myapp.settings'

# Set script name for the PATH_INFO fix below
SCRIPT_NAME = os.getcwd()

class PassengerPathInfoFix(object):
    """
        Sets PATH_INFO from REQUEST_URI because Passenger doesn't provide it.
    """
    def __init__(self, app):
        self.app = app

    def __call__(self, environ, start_response):
        from urllib.parse import unquote
        environ['SCRIPT_NAME'] = SCRIPT_NAME
        request_uri = unquote(environ['REQUEST_URI'])
        script_name = unquote(environ.get('SCRIPT_NAME', ''))
        offset = request_uri.startswith(script_name) and len(environ['SCRIPT_NAME']) or 0
        environ['PATH_INFO'] = request_uri[offset:].split('?', 1)[0]
        return self.app(environ, start_response)

# Set the application
application = get_wsgi_application()
application = PassengerPathInfoFix(application)
Final Setup and Django Commands
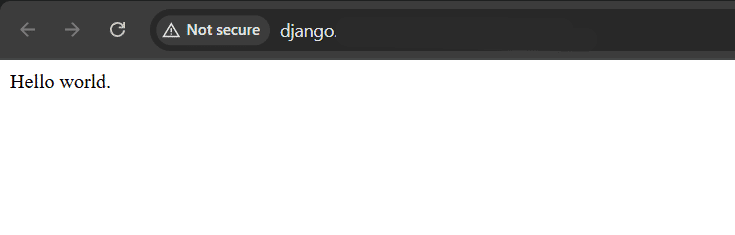
Create a basic index.html file in the ~/myapp/templates/static_pages directory.The file can be as simple as a text file that says Hello world.
Vim ~/myapp/templates/static_pages/index.html

Hello world
Run Django commands
python ~/myapp/manage.py migrate
Set up the superuser account:
python ~/myapp/manage.py createsuperuser
-
-
-
- At the Username prompt, type the administrator username, and then press Enter.
- At the Email address prompt, type the administrator e-mail address, and then press Enter.
- At the Password prompt, type the administrator password, and then press Enter.
- Type the following command to collect the static files:
python ~/myapp/manage.py collectstatic
-
-
Restart App & Test
The final step is to refresh the server so it recognizes your changes. Navigate back to the Setup Python App section in cPanel and click the Restart button next to your application.

Setup Python App
Open your browser and visit your domain to see your “Hello World” message.
Setup Python App
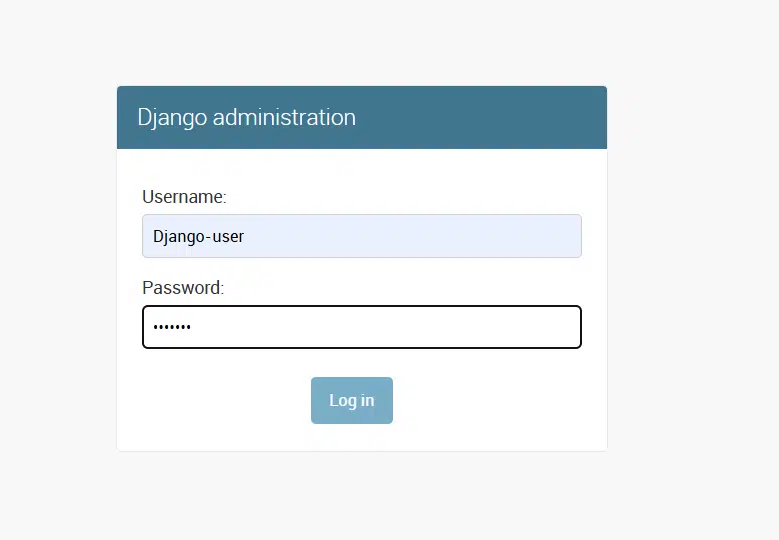
You should also verify the backend by visiting yourdomain.com/admin and logging in with the superuser credentials you created earlier. If the site fails to load, you can manually run python ~/myapp/passenger_wsgi.py in SSH to check for hidden syntax errors.
Setup Python App
Wrapping Up
Congratulations! You have successfully installed and configured a Django application on a Linux shared hosting plan. While the setup requires a few extra steps compared to local development, using the WordPress Toolkit-like efficiency of the Python Selector makes managing your environment much simpler. By following these steps, you now have a robust Python framework ready for your next big project.
If you have any web hosting questions please feel free to reach out to us. We're happy to help.
Our Guiding Principles