In this guide we go through the steps for installing LiteSpeed Web Server on CentOS 7.
All commands – without sudo
yum -y update
yum groupinstall "Development Tools" -y
wget http://www.litespeedtech.com/packages/5.0/lsws-5.3.7-ent-x86_64-linux.tar.gz
tar -zxvf lsws*
cd lsws-5.3.7
./install.sh
rpm -ivh http://rpms.litespeedtech.com/centos/litespeed-repo-1.1-1.el7.noarch.rpm yum install lsphp73 lsphp73-mysqlnd
ln -sf /usr/local/lsws/lsphp73/bin/lsphp /usr/local/lsws/fcgi-bin/lsphp7
firewall-cmd --permanent --zone=public --add-service=http
firewall-cmd --permanent --zone=public --add-port=7080/tcp
firewall-cmd --reload
All commands – with sudo
sudo yum -y update
sudo yum groupinstall "Development Tools" -y
sudo wget http://www.litespeedtech.com/packages/5.0/lsws-5.3.7-ent-x86_64-linux.tar.gz
sudo tar -zxvf lsws*
sudo cd lsws-5.3.7
sudo ./install.sh
rpm -ivh http://rpms.litespeedtech.com/centos/litespeed-repo-1.1-1.el7.noarch.rpm
yum install lsphp73 lsphp73-mysqlnd
ln -sf /usr/local/lsws/lsphp73/bin/lsphp /usr/local/lsws/fcgi-bin/lsphp7
sudo firewall-cmd --permanent --zone=public --add-service=http
sudo firewall-cmd --permanent --zone=public --add-port=7080/tcp
sudo firewall-cmd --reload
LiteSpeed is alternative to the Apache web server that offers greater performance capabilities and uses less server resources. LiteSpeed has all the features of Apache including mod_rewrite, .htaccess, and mod_security. LiteSpeed also loads Apache configuration files directly and functions as a drop-in replacement for the Apache web server.
Requirements
LiteSpeed is proprietary software and requires a licence to use. For evaluation purposes you can to obtain a trial license key from LiteSpeed and copy it to the installation directory. If you already have a production license, copy the serial number from the confirmation email to the installation directory before you start the installation.
This tutorial is specific to CentOS 7 server and assumes you have root access. If you are not logged in as a root then switch to the root user.
System Update
Before starting up any installation it’s best to perform a system update first.
yum -y update
This will be executed at the command line. The “y” switch will pass the automatic confirmation to the yum package manager.
Installing the Developer Tools for LiteSpeed
The first part of the installation is to install the Development Tools. You can install Development Tools by executing the following command in the terminal.
yum groupinstall "Development Tools" -y
The following modules and dependencies will be installed.
Installed:
autoconf.noarch 0:2.69-11.el7 automake.noarch 0:1.13.4-3.el7 bison.x86_64 0:3.0.4-2.el7 byacc.x86_64 0:1.9.20130304-3.el7 cscope.x86_64 0:15.8-10.el7
ctags.x86_64 0:5.8-13.el7 diffstat.x86_64 0:1.57-4.el7 doxygen.x86_64 1:1.8.5-3.el7 elfutils.x86_64 0:0.172-2.el7 flex.x86_64 0:2.5.37-6.el7
gcc.x86_64 0:4.8.5-36.el7 gcc-c++.x86_64 0:4.8.5-36.el7 gcc-gfortran.x86_64 0:4.8.5-36.el7 git.x86_64 0:1.8.3.1-20.el7 indent.x86_64 0:2.2.11-13.el7
intltool.noarch 0:0.50.2-7.el7 libtool.x86_64 0:2.4.2-22.el7_3 patch.x86_64 0:2.7.1-10.el7_5 patchutils.x86_64 0:0.3.3-4.el7 rcs.x86_64 0:5.9.0-5.el7
redhat-rpm-config.noarch 0:9.1.0-87.el7.centos rpm-build.x86_64 0:4.11.3-35.el7 rpm-sign.x86_64 0:4.11.3-35.el7 subversion.x86_64 0:1.7.14-14.el7 swig.x86_64 0:2.0.10-5.el7
systemtap.x86_64 0:3.3-3.el7

Dependency Installed:
apr.x86_64 0:1.4.8-3.el7_4.1 apr-util.x86_64 0:1.5.2-6.el7 avahi-libs.x86_64 0:0.6.31-19.el7 boost-date-time.x86_64 0:1.53.0-27.el7
boost-system.
x86_64 0:1.53.0-27.el7 boost-thread.x86_64 0:1.53.0-27.el7 bzip2.x86_64 0:1.0.6-13.el7 cpp.x86_64 0:4.8.5-36.el7
dwz.x86_64 0:0.11-3.el7 dyninst.x86_64 0:9.3.1-2.el7 efivar-libs.x86_64 0:36-11.el7_6.1 emacs-filesystem.noarch 1:24.3-22.el7
gdb.x86_64 0:7.6.1-114.el7 gettext-common-devel.noarch 0:0.19.8.1-2.el7 gettext-devel.x86_64 0:0.19.8.1-2.el7 glibc-devel.x86_64 0:2.17-260.el7_6.3
glibc-headers.x86_64 0:2.17-260.el7_6.3 gnutls.x86_64 0:3.3.29-8.el7 kernel-debug-devel.x86_64 0:3.10.0-957.5.1.el7 kernel-headers.x86_64 0:3.10.0-957.5.1.el7
libdwarf.x86_64 0:20130207-4.el7 libgfortran.x86_64 0:4.8.5-36.el7 libmodman.x86_64 0:2.0.1-8.el7 libmpc.x86_64 0:1.0.1-3.el7
libproxy.x86_64 0:0.4.11-11.el7 libquadmath.x86_64 0:4.8.5-36.el7 libquadmath-devel.x86_64 0:4.8.5-36.el7 libstdc++-devel.x86_64 0:4.8.5-36.el7
m4.x86_64 0:1.4.16-10.el7 mokutil.x86_64 0:15-1.el7.centos mpfr.x86_64 0:3.1.1-4.el7 neon.x86_64 0:0.30.0-3.el7
nettle.x86_64 0:2.7.1-8.el7 pakchois.x86_64 0:0.4-10.el7 perl-Data-Dumper.x86_64 0:2.145-3.el7 perl-Error.noarch 1:0.17020-2.el7
perl-Git.noarch 0:1.8.3.1-20.el7 perl-TermReadKey.x86_64 0:2.30-20.el7 perl-Test-Harness.noarch 0:3.28-3.el7 perl-Thread-Queue.noarch 0:3.02-2.el7
perl-XML-Parser.x86_64 0:2.41-10.el7 perl-srpm-macros.noarch 0:1-8.el7 rsync.x86_64 0:3.1.2-4.el7 subversion-libs.x86_64 0:1.7.14-14.el7
systemtap-client.x86_64 0:3.3-3.el7 systemtap-devel.x86_64 0:3.3-3.el7 systemtap-runtime.x86_64 0:3.3-3.el7 trousers.x86_64 0:0.3.14-2.el7
Downloading LiteSpeed
We need to download the latest stable release of LiteSpeed web server. You can check for latest release on the LiteSpeed Website .
Right-click the download button and copy the link and execute on your server using the wget command as shown below.
wget http://www.litespeedtech.com/packages/5.0/lsws-5.3.7-ent-x86_64-linux.tar.gz
The downloaded LiteSpeed package is in compressed format. We will need to extract it to a convenient location.
tar -zxvf lsws*
Installing LiteSpeed
Change directory to the newly created LiteSpeed directory.
cd lsws-5.3.7
Install the package by executing the script install.sh
./install.sh
The first step of the installation is agreeing to the Terms of Service. Go through the terms and type “Yes” to continue the installation.
Important: In order to continue installation you must agree with above
           license terms by typing "Yes" with capital "Y"!

Do you agree with the above license?
Next, the installation will ask to specify the directory to install LiteSpeed. Choose a custom destination for the installation; or to install it in the default directory simply press ‘Enter’.
Note: You must have permissions to create and manage the installation directory.
Please specify the destination directory. You must have permissions to
create and manage the directory. It is recommended to install the web server
at /opt/lsws, /usr/local/lsws or in your home directory like '~/lsws'.

ATTENTION: The user 'nobody' must be able to access the destination
           directory.

Destination [/usr/local/lsws]:
Enter a preferred username for the administrator.
Please specify the user name of the administrator.
This is the user name required to log into the administration web interface.

User name [admin]:
If you want to use the name “admin”, simply press ‘Enter’. Best practice is to choose a unique username. This makes it more difficult for hackers to guess. Enter a custom username for the administrator and press ‘Enter’.
You will now be asked to enter a password for the administrator account which is used to access the web interface.
Please specify the administrator's password.
This is the password required to log into the administration web interface.

Password:
The username and password are required to log into the administration web interface. Please make sure to keep the username and password somewhere safe for further use.
The next prompt asks you to provide a valid email address to send notifications about anything related to your server/LiteSpeed install. LiteSpeed will send notifications/alerts to the email addresses that you specify.
Please specify administrators' email addresses.
It is recommended to specify a real email address,
Multiple email addresses can be set by a comma
delimited list of email addresses. Whenever something
abnormal happened, a notification will be sent to
emails listed here.

Email addresses [root@localhost]:
Next, provide the user under which this server should run. You can either create a new user with non-root privileges or press ‘Enter’ to choose the default user “nobody”.
As you are the root user, you must choose the user and group
whom the web server will be running as. For security reason, you should choose
a non-system user who does not have login shell and home directory such as
'nobody'.

User [nobody]:
Do the same for the next prompt.
Please choose the group that the web server running as.

User 'nobody' is the member of following group(s): nobody
Group [nobody]:
Next, specify the port number for LiteSpeed.
Please specify the port for normal HTTP service.
Port 80 is the standard HTTP port, only 'root' user is allowed to use
port 80, if you have another web server running on port 80, you need to
specify another port or stop the other web server before starting LiteSpeed
Web Server.
You can access the normal web page at http://<YOUR_HOST>:<HTTP_PORT>/

HTTP port [8088]: 80
We have to setup the administration web interface that manages LiteSpeed web server. This web interface will need to run on another port, 7080 (default). Please leave it as default, unless you want it to listen on another port.
Please specify the HTTP port for the administration web interface,
which can be accessed through http://<YOUR_HOST>:<ADMIN_PORT>/

Admin HTTP port [7080]:
You will now be able to reach the administration web interface by typing http://domain.com:port.
Next, choose whether or not to enable PHP to use a CMS (WordPress or Joomla). Type “Y” to enable PHP or “n” not to use it.
You can setup a global script handler for PHP with the pre-built PHP engine
shipped with this package now. The PHP engine runs as Fast CGI which
outperforms Apache's mod_php.
You can always replace the pre-built PHP engine with your customized PHP
engine.

Setup up PHP [Y/n]: Y
The next prompt is for advanced users. Simply press ‘Enter’ to continue.
Suffix for PHP script(comma separated list) [php]:
Next, you will be asked if you want to enable AWStats. AWStats is an open source Web analytics reporting tool that generated statistics so that you can see detailed information about your site visitors.
Type “y” if you need AWStats, or “N” if you don’t need this.
AWStats is a popular log analyzer that generates advanced web server
statistics. LiteSpeed web server seamlessly integrates AWStats into
its Web Admin Interface. AWStats configuration and statistics update
have been taken care of by LiteSpeed web server.

Note: If AWStats has been installed already, you do not need to
install again unless a new version of AWStats is available.

Would you like to install AWStats Add-on module [y/N]? N
The next prompt allows you to start LiteSpeed automatically after the server restarts, to prevent downtime. It is recommended to type “Y”.
Would you like to have LiteSpeed Web Server started automatically
when the server restarts [Y/n]? Y
To start LiteSpeed now, type “Y” or If you want to start it later manually, type “n”.
[OK] The startup script has been successfully installed!
Would you like to start it right now [Y/n]? Y
If you see the following message, then the installation has been completed successfully.
LiteSpeed Web Server started successfully! Have fun!
Installing PHP
To install the latest PHP version and its dependencies, we need to add the LiteSpeed and EPEL repositories with the following command.
rpm -ivh http://rpms.litespeedtech.com/centos/litespeed-repo-1.1-1.el7.noarch.rpm
yum install epel-release -y
Install PHP 7.3 and its MySQL extension with the command below,
yum install lsphp73 lsphp73-mysqlnd
Login to LiteSpeed the web admin console.
http://<YOUR_HOST/IP>:7080
Go to Configuration > External App and click on ADD. Select LSAPI App from the drop down field and click Next.
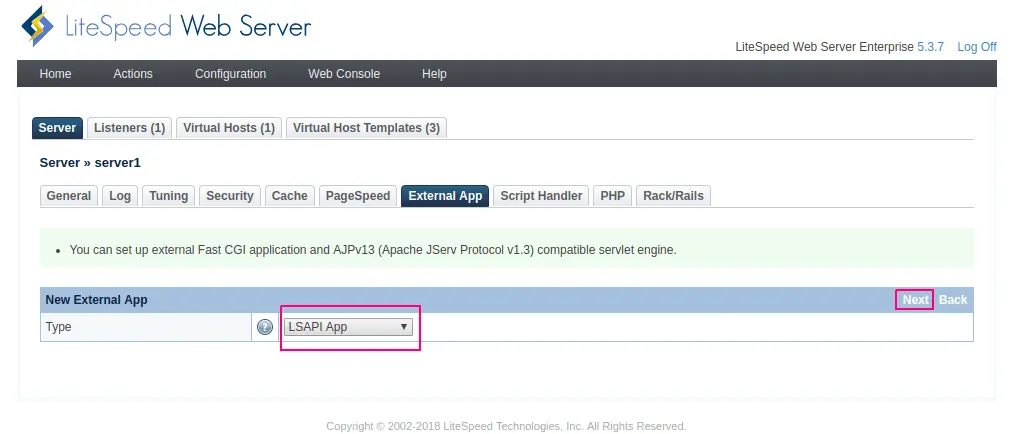
Adding a New LSAPI.
Fill out the fields in the next page as shown in the snippet below.
Name: lsphp73
Address: uds://tmp/lshttpd/lsphp.sock
Max Connections: 35
Environment: PHP_LSAPI_MAX_REQUESTS=500
PHP_LSAPI_CHILDREN=35
Initial Request Timeout (secs): 60
Retry Timeout : 0
Response Buffering: no
Start By Server: yes
Command: $SERVER_ROOT/lsphp73/bin/lsphp
Back Log: 100
Instances: 1
Memory Soft Limit (bytes): 2047M
Memory Hard Limit (bytes):2047M
Process Soft Limit: 400
Process Hard Limit: 500
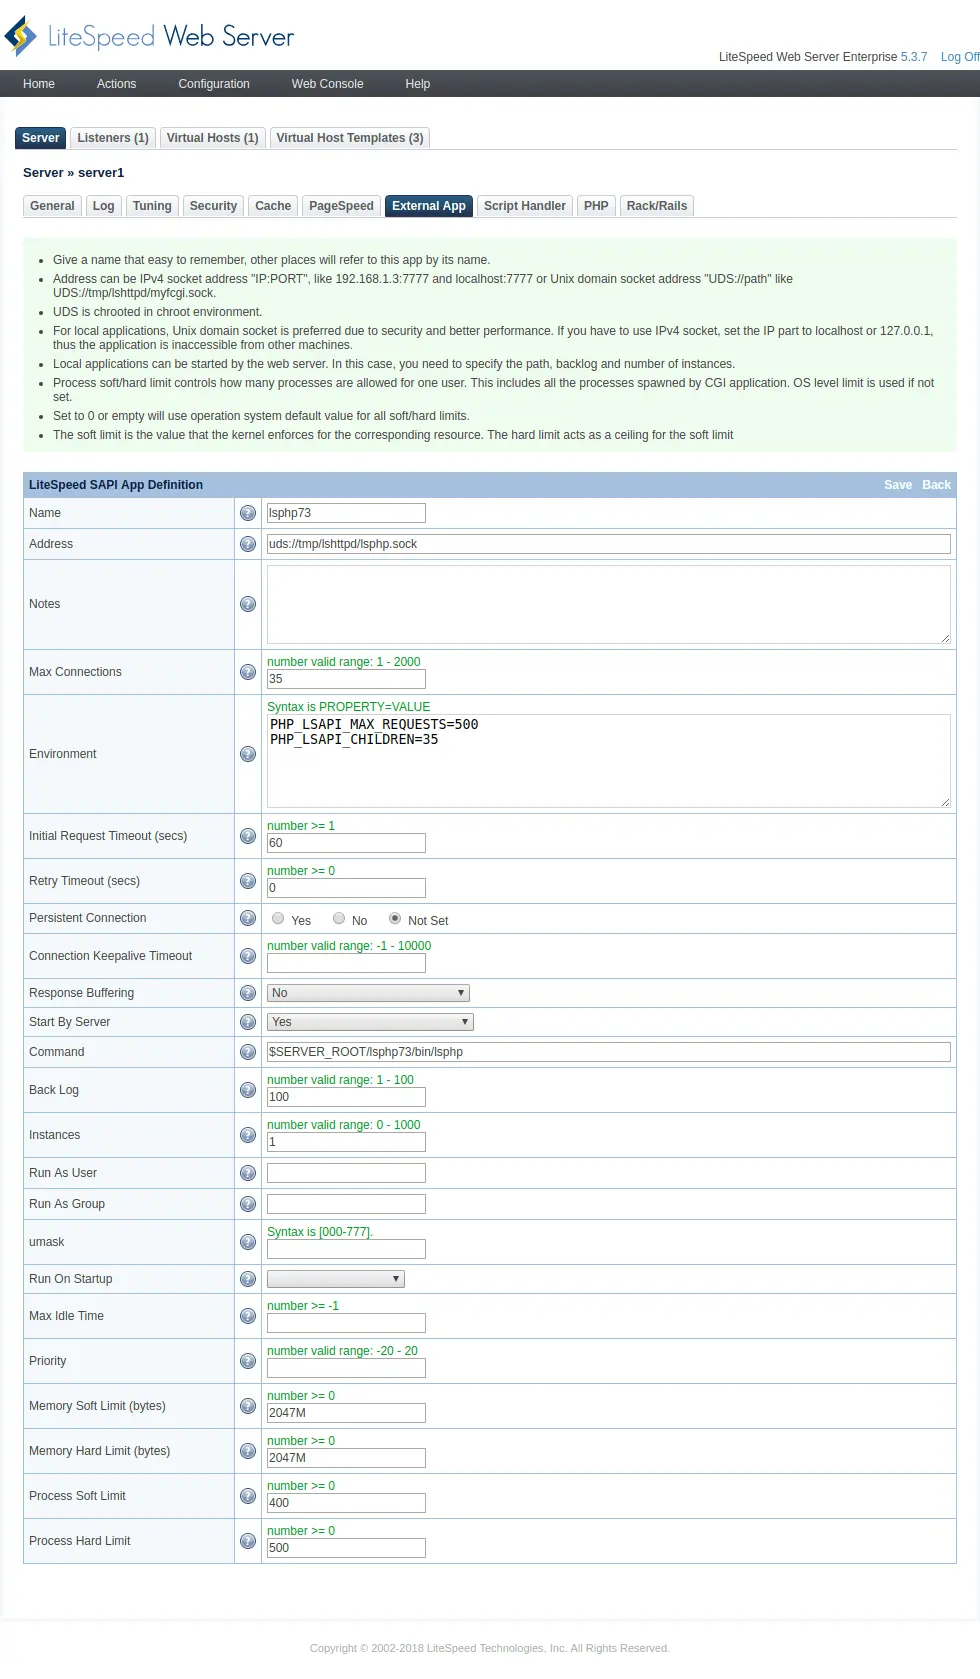
PHP Configuration in LS Web Admin Console.
Save the config and then go to the tab “Script Handler”. Add a new script handler as shown in the image below.
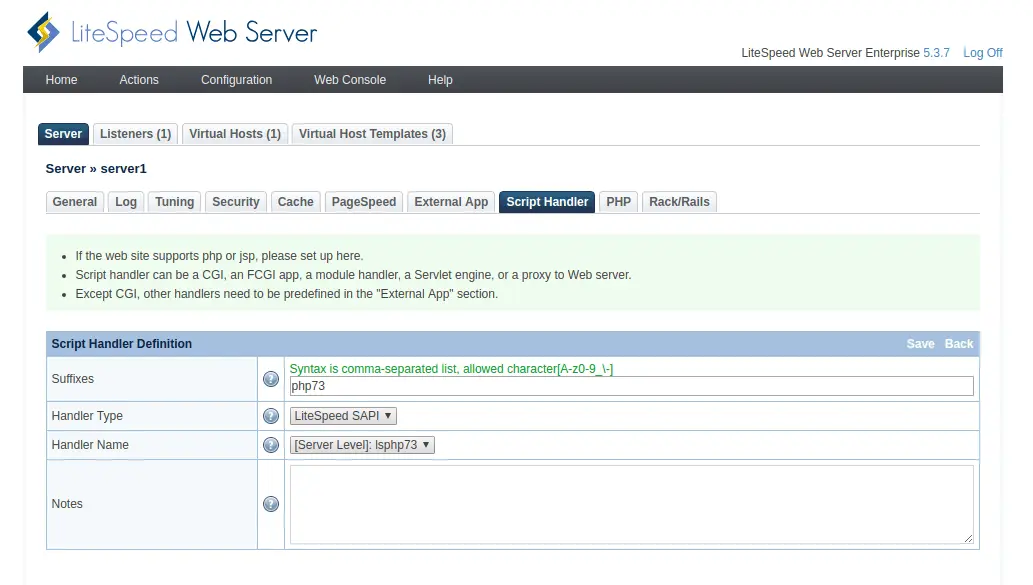
Script Handler in LS Web Admin Console.
Save and go to Home > General > click the icon to the right of Apply Changes / Graceful Restart to restart LiteSpeed.
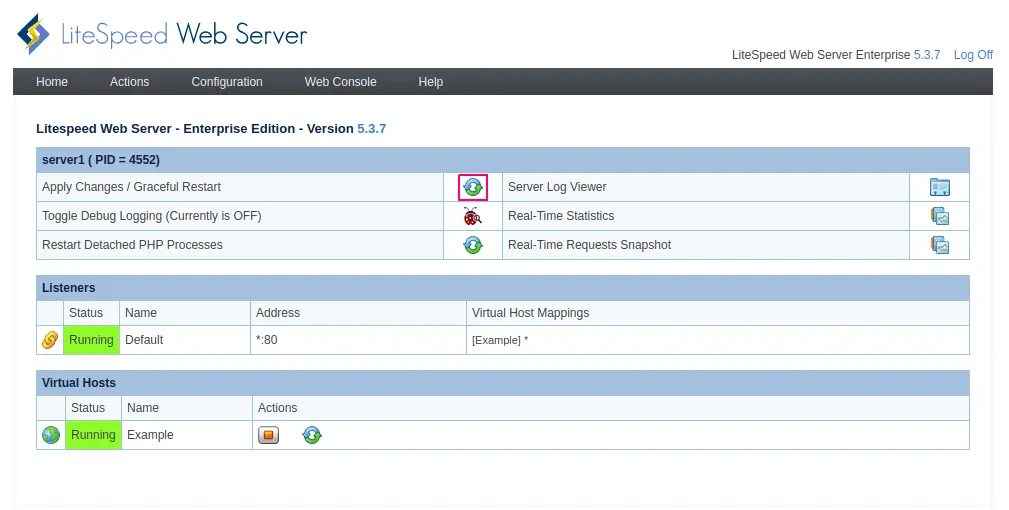
Restarting LiteSpeed.
Check Your PHP Installation
Check that your PHP installation is correct by viewing the phpinfo() page.
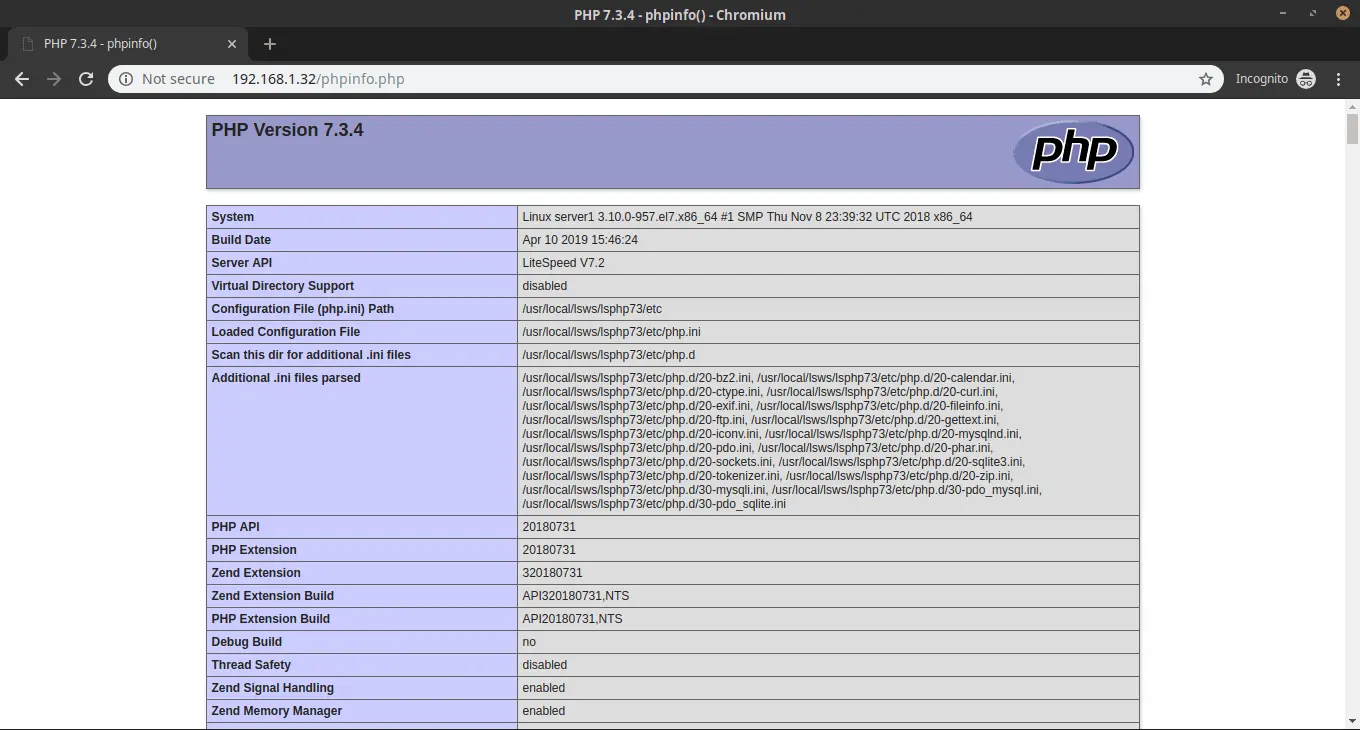
PHP Info Page.
Configure Firewalld
Run the commands below to configure firewalld.
firewall-cmd --permanent --zone=public --add-service=http

firewall-cmd --permanent --zone=public --add-port=7080/tcp
Reload the firewalld services using the command below,
firewall-cmd --reload
If you want to try out ConfigServer Security & Firewall we have a KB on how to install CSF.
Conclusion
You now have a fully functional LiteSpeed web server. If you go to your server IP or domain name now, you can see the default page of a LiteSpeed web server.
If you have any web hosting questions please feel free to reach out to us. We're happy to help.
Our Guiding Principles