
Secure Shell (SSH) is a powerful tool that allows website owners and developers to manage hosting accounts through a command-line interface. Instead of relying entirely on a graphical control panel, you can use SSH to navigate files, run scripts, manage applications, and perform other technical tasks directly on your hosting account.
If you are new to web hosting, learning how to use SSH on shared hosting can make routine website management faster and more efficient. You do not need to be a system administrator to get started. With the right connection details and a few basic commands, you can begin using SSH safely.
In this guide, you will learn how SSH works, how to enable SSH on shared hosting, how to connect through cPanel or PuTTY, how to generate SSH keys, and how to troubleshoot common connection problems.
What Is SSH on Shared Hosting?
SSH stands for Secure Shell, a network protocol that creates an encrypted connection between your computer and a remote server. SSH access on shared hosting lets you execute permitted commands on your hosting account without directly accessing the server’s graphical interface.
Shared hosting means multiple customers host their websites on the same physical server, with separate accounts and resource limits. Your SSH permissions depend on your hosting provider’s configuration.
For example, SSH may allow you to:
- Navigate website directories and inspect files.
- Run supported PHP scripts and command-line tools.
- Manage Git repositories and application files.
- Use WP-CLI to perform supported WordPress administration tasks.
- Run Composer commands when the required PHP and Composer versions are available.
- Check file permissions and troubleshoot selected website issues.
Important: SSH access on shared hosting does not automatically provide root or administrator privileges. You generally work within the permissions and resource limits assigned to your hosting account.
Benefits of Using SSH for Beginners
SSH can make website maintenance easier, particularly when you manage WordPress websites, development projects, or multiple files.
1. Faster Website Management
You can perform repetitive operations through commands rather than navigating several folders in a file manager. For example, pwd displays your current directory, while ls lists its contents.
2. Access to Developer Tools
Depending on your hosting plan, SSH may support Git, Composer, PHP CLI, WP-CLI, and other development utilities. These tools can simplify application updates and routine maintenance.
3. Encrypted Remote Access
Secure Shell hosting uses encryption to protect data transmitted between your computer and the server. SSH key authentication can also reduce reliance on password-only logins.
4. Better Troubleshooting
SSH can help you inspect directories, verify file locations, review selected logs when permitted, and run diagnostic commands. This can be useful when a website encounters an application error.
5. More Efficient Workflows
Developers and website administrators can automate supported tasks using scripts. However, shared hosting may restrict background processes, execution time, memory usage, and other resource-intensive operations.
How to Enable SSH on Shared Hosting
Before attempting an SSH connection, check whether your hosting account has shell access enabled.
Step 1: Check Your Hosting Plan
Review your provider’s documentation or contact its support team to confirm that SSH is available for your account.
For VeeroTech customers, read the official guide: SSH Access for Shared & Reseller Hosting.
VeeroTech’s documented process requires customers to submit a support ticket to request SSH access. Its instructions also specify that the support team provides the connection port.
Step 2: Request SSH Access
If access is not enabled, contact your hosting provider and request SSH access for your cPanel account.
Ask the support team for:
- SSH hostname or server IP address.
- Your hosting account’s SSH username.
- The correct SSH port.
- The permitted authentication method.
- Any shell restrictions or setup instructions.
Do not assume SSH uses port 22. VeeroTech’s shared and reseller hosting documentation specifically states that port 22 is not allowed for SSH connections on those services.
Step 3: Check cPanel SSH Settings
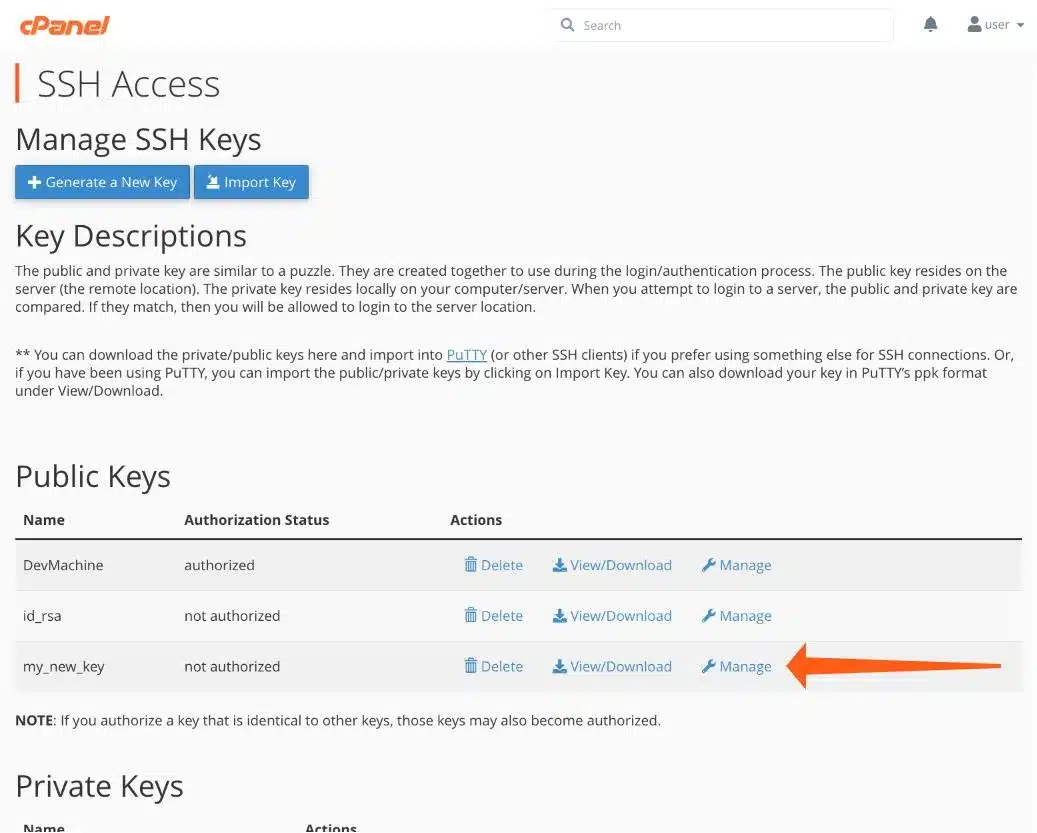
Log in to cPanel and look for Security → SSH Access. Depending on the hosting configuration, you may be able to manage SSH keys from this screen.
Some accounts also provide a Terminal interface under the Advanced section. Its availability depends on the hosting provider and account permissions.
If SSH Access or Terminal is missing, contact support instead of attempting to change server-level settings yourself.
How to Connect to Hosting via SSH
Once SSH access is enabled, you need an SSH client and the correct connection details.
Option 1: Connect Using Windows Terminal or PowerShell
Recent Windows versions include an OpenSSH client. Open PowerShell or Windows Terminal and enter:
ssh -p YOUR_PORT YOUR_USERNAME@YOUR_HOST
Replace YOUR_PORT, YOUR_USERNAME, and YOUR_HOST with the values supplied by your hosting provider.
For example, if your provider gives you port 12345, the command might look like this:
ssh -p 12345 cpaneluser@server.example.com
The hostname, username, and port above are illustrative. Use your actual connection details.
On your first connection, you may be asked to verify the server’s host-key fingerprint. Confirm it against a trusted fingerprint supplied by your provider before accepting it. If password authentication is enabled, enter your password when prompted. The characters may not appear while you type.
Option 2: SSH Connection Using PuTTY
PuTTY is a popular SSH client for Windows. A PuTTY SSH connection is useful if you prefer a graphical application instead of typing the entire command into a terminal.
Follow these steps:
- Download PuTTY from its official website: https://www.putty.org/.
- Open PuTTY and locate the Session settings.
- Enter your hosting server’s hostname or IP address.
- Enter the SSH port provided by your hosting company.
- Select SSH as the connection type.
- Click Open.
- Verify the server fingerprint when prompted.
- Enter your hosting username and complete the configured authentication process.
If your provider uses a nonstandard SSH port, enter that port rather than assuming the default port 22.
SSH Connection Methods Compared
| Method | Best for | What you need |
| Windows Terminal / PowerShell | Users comfortable with commands | OpenSSH client |
| macOS / Linux Terminal | Developers and website administrators | Built-in SSH client |
| PuTTY | Windows users who prefer a GUI | PuTTY application |
| cPanel Terminal | Quick browser-based access | Provider-enabled Terminal |
SSH Commands for Beginners
After a successful SSH login, you can use commands to inspect and manage files within your permitted environment.
| Command | Purpose | Example |
pwd |
Display current directory | pwd |
ls |
List files and folders | ls -la |
cd |
Change directory | cd public_html |
mkdir |
Create a directory | mkdir test-folder |
php -v |
Check PHP CLI version | php -v |
git --version |
Check Git availability | git --version |
whoami |
Display current account identity | whoami |
These commands may be available on shared hosting, but installed utilities and permissions vary between providers.
Navigate Website Files
Use pwd to see your current directory and ls -la to list files, including hidden files. To move into your website directory, try:
cd public_html
ls -la
The public_html directory is common in cPanel accounts, but your website’s document root may be different. Check your account configuration if the directory does not exist.
Run PHP and Developer Tools
To check whether PHP CLI is available, run:
php -v
If Composer or WP-CLI is installed and supported, you can check its availability with the appropriate version command. Do not assume that a command-line PHP version is identical to the PHP version configured for your website.
Safety tip: Avoid running unfamiliar scripts or destructive commands. Commands that recursively delete files or change permissions can damage your website if used incorrectly.
SSH Key Authentication: How to Generate SSH Keys
SSH public and private keys provide an alternative to password-based authentication. The public key is installed or authorized on the server, while the private key stays on your computer.
Never share your private key with anyone or upload it to a public repository.
Step 1: Generate an SSH Key Pair
On Windows, macOS, or Linux systems with OpenSSH installed, run:
ssh-keygen -t ed25519 -C "your-email@example.com"
Follow the prompts to choose where to save the key and set a passphrase. If your hosting provider requires a different key type, follow its instructions.
Step 2: Add the Public Key in cPanel
If your account supports key management:
- Log in to cPanel.
- Open Security → SSH Access.
- Select Manage SSH Keys.
- Generate a key through cPanel or import your existing public key.
- Select Manage beside the public key.
- Click Authorize.
The exact options depend on your provider’s configuration.
Step 3: Connect Using Your Private Key
Use the following command, replacing the example values with your actual details:
ssh -i ~/.ssh/id_ed25519 -p YOUR_PORT YOUR_USERNAME@YOUR_HOST
Enter the private key’s passphrase if prompted. If authentication fails, confirm that the corresponding public key has been authorized and that the client is using the correct private key.
Password Authentication vs. SSH Key Authentication
| Feature | Password login | SSH key authentication |
| Credentials | Account password | Private key and, optionally, a passphrase |
| Setup | Usually simpler | Requires key generation and authorization |
| Security | Depends on password strength and server policy | Strong when keys are managed securely |
| Best practice | Follow provider requirements | Prefer when supported and properly configured |
What Can You Do With SSH Access Without Root Privileges?
SSH access on shared hosting is designed for account-level tasks, not unrestricted server administration.
Depending on your plan and permissions, you may be able to:
- Manage website files and directories.
- Run supported application commands.
- Work with Git repositories.
- Use WordPress command-line tools.
- Inspect selected logs and configuration files accessible to your account.
You generally cannot install system packages, change global server configuration, manage other customers’ files, or use unrestricted administrative commands. These activities usually require privileges that shared hosting does not provide.
If your project needs custom system packages, persistent background services, or root-level configuration, consider a VPS instead. Compare the available options on VeeroTech Managed VPS Hosting.
SSH Troubleshooting for Shared Hosting
If your SSH connection fails, check the error message and verify the following details before changing settings.
Connection Timed Out or Refused
Confirm that SSH is enabled, the hostname is correct, and you are using the port supplied by your hosting provider. A firewall or network restriction may also prevent access.
For VeeroTech shared and reseller hosting, do not use port 22; request the correct port from support.
Permission Denied
Check the username, password, private key path, and public-key authorization status. Confirm that your account has an enabled shell and that the selected authentication method is supported.
Host Key Verification Warning
A changed host-key fingerprint can indicate a legitimate server change, but it can also signal a security risk. Verify the fingerprint with your hosting provider before updating the saved host key.
Command Not Found
The required utility may not be installed, may not be available in your shell environment, or may not be included in your PATH. Check provider documentation or ask support which tools are available.
SSH Access Is Missing in cPanel
Your hosting provider may need to enable shell access or the Terminal feature. Submit a support ticket instead of trying to modify server-level settings.
For account-specific connection problems, contact your hosting provider with the exact error message, timestamp, hostname, and port. Never send your password or private key in a support request.
Best Practices for Secure SSH Usage
Follow these recommendations to keep your SSH session and hosting account secure:
- Use a strong, unique account password when password authentication is enabled.
- Protect private keys with a passphrase and keep secure backups.
- Never share private keys or paste them into public support forums.
- Verify server fingerprints before trusting a new connection.
- Use only commands you understand and stay within your account permissions.
- Keep website backups before running significant maintenance operations.
- Disable or revoke unused keys and remove access that is no longer needed.
- Contact support if you suspect unauthorized access.
Conclusion:
Learning how to use SSH on shared hosting gives you more control over supported website maintenance and development tasks. Start by enabling access, confirming your connection details, learning basic commands, and setting up SSH key authentication when available.
Remember that shared hosting has account-level permissions and resource limits. Always use the port and authentication method provided by your host, and avoid commands that could damage your website.
Ready for reliable hosting with developer-friendly tools? Explore VeeroTech Shared Hosting to review plans that include cPanel, SSH access, WordPress tools, and technical support. Choose a plan that fits your website’s requirements and contact the VeeroTech team if you need help getting started.
Frequently Asked Questions
1. What is SSH on shared hosting?
SSH on shared hosting allows you to connect securely to your hosting account through a command-line interface. It can help with file management, supported development tools, and website maintenance, subject to your account permissions.
2. How do I enable SSH on shared hosting?
Check your hosting plan and request access from your provider if it is not already enabled. For VeeroTech shared and reseller hosting, submit a support ticket to request SSH access and obtain the correct connection port.
3. Can I use SSH in cPanel?
Yes, if your hosting provider enables the relevant features. cPanel may provide SSH Access for key management and, on supported accounts, a browser-based Terminal.
4. Can I use SSH without root privileges?
Yes. Most shared hosting SSH sessions use a restricted account rather than root access. You can perform permitted account-level tasks, but system administration commands and global configuration changes are generally unavailable.
5. Why is my SSH connection not working?
Common causes include an incorrect hostname or port, disabled SSH access, invalid credentials, an unauthorized public key, or firewall restrictions. Verify your connection details and contact hosting support if the issue continues.
If you have any web hosting questions please feel free to reach out to us. We're happy to help.